This blog will be focused on converting Cisco AP from Lightweight to Autonomous Mode. This Mode is ideal for AP-on-Stick surveys to help designing your wireless network.
LightWeight to Autonomous Conversion
Tools needed: TFTP server, Putty (for Console Access), POE injector, Ethernet cables, Console cable, Serial to USB adapter.
For this LAB, I will be using Cisco AP 3602i that was previously used in Controller based environment. AP Operating system can be downloaded from here : https://software.cisco.com/download/home/284006700/type/284180979/release/15.3.3-JF10
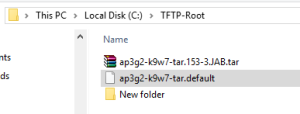
Add the downloaded software to TFTP Server Root Directory in your laptop, for me its C:\TFTP-Root and rename it to ap3g2-k9w7-tar.default as this is the image name the Access Point is looking for during the boot sequence after holding down the mode button.
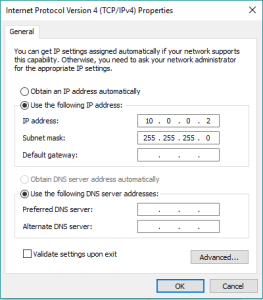
Change you laptop IP address to 10.0.0.2/24
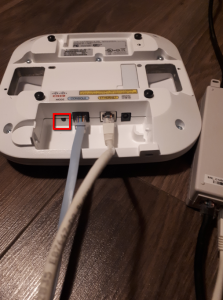
Press and hold down the mode button on the AP, then power on the Access Point for about 20 seconds.
in the CLI you should be seeing the following.
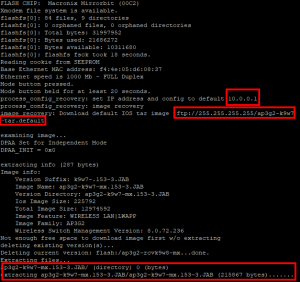
Firmware download and installation on the AP would take about 10 mins followed by a reboot of the access point.
By default the AP will send DHCP request for any available server on your network and if successful an IP will be assigned to Ethernet port BVI1.
To statically assign an AP, you can use the following command.
By default the User name is: cisco and password is : Cisco
ap#conf t
ap(config)#int bvi1
ap(config-if)#ip add
ap(config-if)#ip address x.x.x.x x.x.x.x
You can then access the AP through the web portal for additional configuration.
Can you forward the firmware to me please.
The software is not free. You require an active maintenance agreement with Cisco in order to download. It is illegal to distribute Cisco software images publicly.
I found an interesting caveat to this. I attempted this on a 3700 AP that was a UX model. The 5GHz was stuck in scanner mode because the AP was not primed. Since AirProvision seems to have fallen off the face of the earth, I found a method to do it with a Windows PC from Reddit.
1) Join your target AP SSID.
2) Click on WindowsKey+R, type in PowerShell
3) Use the below command.
– AP IP address
– I used US. You can look this up easily enough.
– I used -A for both
– I set up the login as cisco:cisco for user/pass.
When you execute the command, Windows will pop up a prompt with a prepopulated username, and then you can fill in your password.
Invoke-WebRequest -uri ‘http:///set_universal_ap_reg_domain.shtml?configMode=1&location=®Domain5=®Domain24=’ -Method POST -Credential
My variation…
Invoke-WebRequest -uri ‘http://192.168.10.60/set_universal_ap_reg_domain.shtml?configMode=1&location=US®Domain5=-A®Domain24=-A’ -Method POST -Credential cisco
Reference:
https://www.reddit.com/r/Cisco/comments/onrb89/airprovision_app_for_android_v11/