
Purpose and Objectives
The purpose of this document is to provide guidelines for proper planning, preparation, and identification of the key items required for the three types of surveys: Passive, Active, and Predictive Surveys.
AP-On-Stick Survey
Pre-Deployment Site Surveys (AP on a Stick Surveys) are performed with the survey client associated to the APs used throughout the survey. Pre-Deployment Site Surveys (AP on a Stick Surveys) are commonly used for new WLAN deployments because they provide the most details upon which to base a design.
An Active Survey / AP on Stick Survey is used to validate the Predictive survey design, and to confirm all requirements are met (e.g., signal strength and a minimum of 3 APs at any given location).
There are two main methods used in a Pre-Deployment Site Survey (AP on a Stick Survey):
- Basic Service Set Identifier (BSSID) Method: This method locks a client into an AP’s radio MAC address and prevents the client from roaming.
- Service Set Identifier (SSID) Method: This is more commonly used for post-deployment scenarios and used to survey multiple APs. It enables the survey client to associate to an SSID where the client roams between multiple APs.
Conducting Pre-Deployment Site Surveys for Standard Indoor Coverage
- se a new project file for the onsite Pre-Deployment Site Survey (AP on a Stick), to eliminate issues related to large file size when combining multiple site survey types.
- Disable the built-in Wireless NIC on the survey laptop or through ESS under the NIC settings.

- Connect NIC-300, SA-1 or Ekahau Sidekick adapter to the laptop
- Start Ekahau ESS project and verify that the floor plan is scaled/calibrated, using measuring tape or laser measuring device to measure the width of a hallway or a room wall (the calibration or distance should be identical to the predictive and passive survey configuration)
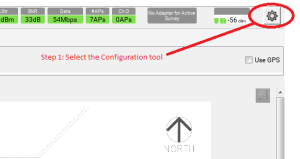
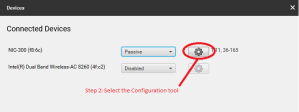
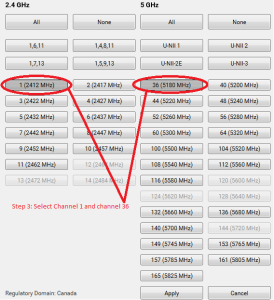
- Select the appropriate channel from the configuration tool. (See example below: in this case Channel 1 and 36 were selected), you can login to the AP or use ESS to find the channels the Access Point is operating in.
- Place the survey AP using the location from the Predictive Site Survey
- Place the AP as close to the ceiling as possible in a parallel position to the floor/ceiling (for standard indoor height of 8-10 feet)
- Access Point should be at a safe distance (3 feet away) from lights, sprinklers, vents, doorways and signs. Avoid placing the AP in the middle of the hallway
- Note the location of the AP during the survey if different from the predictive survey design

- Start the survey walk-through around the Access Point to build a cell edge of -80 dBm (for the 5 GHz band) as this will validate the cell boundary for -65 dBm. Access as many areas as possible for a more accurate RF signal propagation
- Continuous surveys is the preferred mode and Stop and Go mode can also be used if you are more comfortable with that approach.

- Walk at a steady speed and left click on the floor when you are making a turn (Going in and out of rooms, changing direction) and right mouse click when the survey is completed or when taking a break due to room access issues or anything else that could interrupt the survey walk through. Walk in both direction when surveying the Hallways.
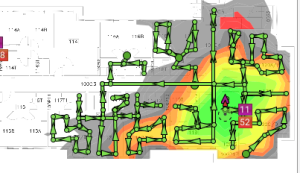
- Use the “Undo “Button to backtrack the survey path during active site survey if you made a mistake following the floor plan.

- Select the Survey Access Point as follow
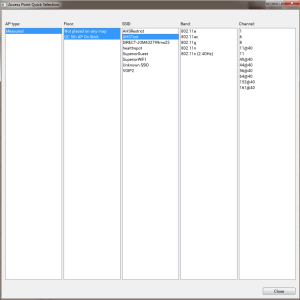
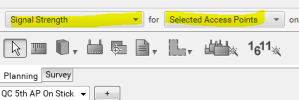
- Review “TestSSID” SSID signal strength with -80 dBm seen around the AP before moving to the next step
- For the next survey point planned in the predictive survey.
- Select and freeze the location of the first AP on the survey tool (Green Circle)
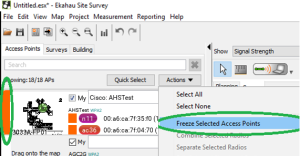
- All Surveyed AP locations need to remain in the “Freeze” status after moving the AP to a new location.
- Start surveying the second AP following the steps in section 4
- Repeat the above steps to survey the remaining Access Points
